JWT Auth with Golang & React
JSON Web Tokens (JWT) Authentication with Golang: A Complete Guide
If you’re curious about JSON Web Tokens (JWT) or looking to add authentication to your project, then this post is for you. Today, we’ll explore JWT authentication and build an authentication server using Golang. We’ll also cover how to connect it with the frontend. By the end of this guide, you’ll be equipped to implement JWT for your own projects. So, grab a coffee and let’s dive in!
What is JWT?
JSON Web Token, abbreviated as JWT, is a compact, URL-safe means of representing claims between two parties. It is commonly used for authentication and authorization but can also be applied to securely transfer data between client and server.
The JWT consists of three parts:
- Header: Contains metadata such as the token type (
JWT) and the signing algorithm (HS256). - Payload: Holds the claims, including user information and token expiration.
- Signature: A hashed combination of the header, payload, and a secret key, ensuring the token hasn’t been tampered with.
Each part is Base64 encoded, and this encoded string is what forms the JWT.
Structure of a JWT
- Header: Typically contains two properties: the signing algorithm and token type.
- Payload: Holds essential information for user authorization, such as the user ID (
sub), the username (name), and the issuance time (iat). - Signature: This ensures the integrity of the token. If any part of the token is altered (such as the payload), the signature will no longer match, and the server will invalidate the token.
JWT is popular because it ensures data integrity — if someone tries to modify the token, the server can detect it.
JWT Authentication Flow
Let’s take a look at how JWT-based authentication works in a typical app. Here’s a quick breakdown of the flow:
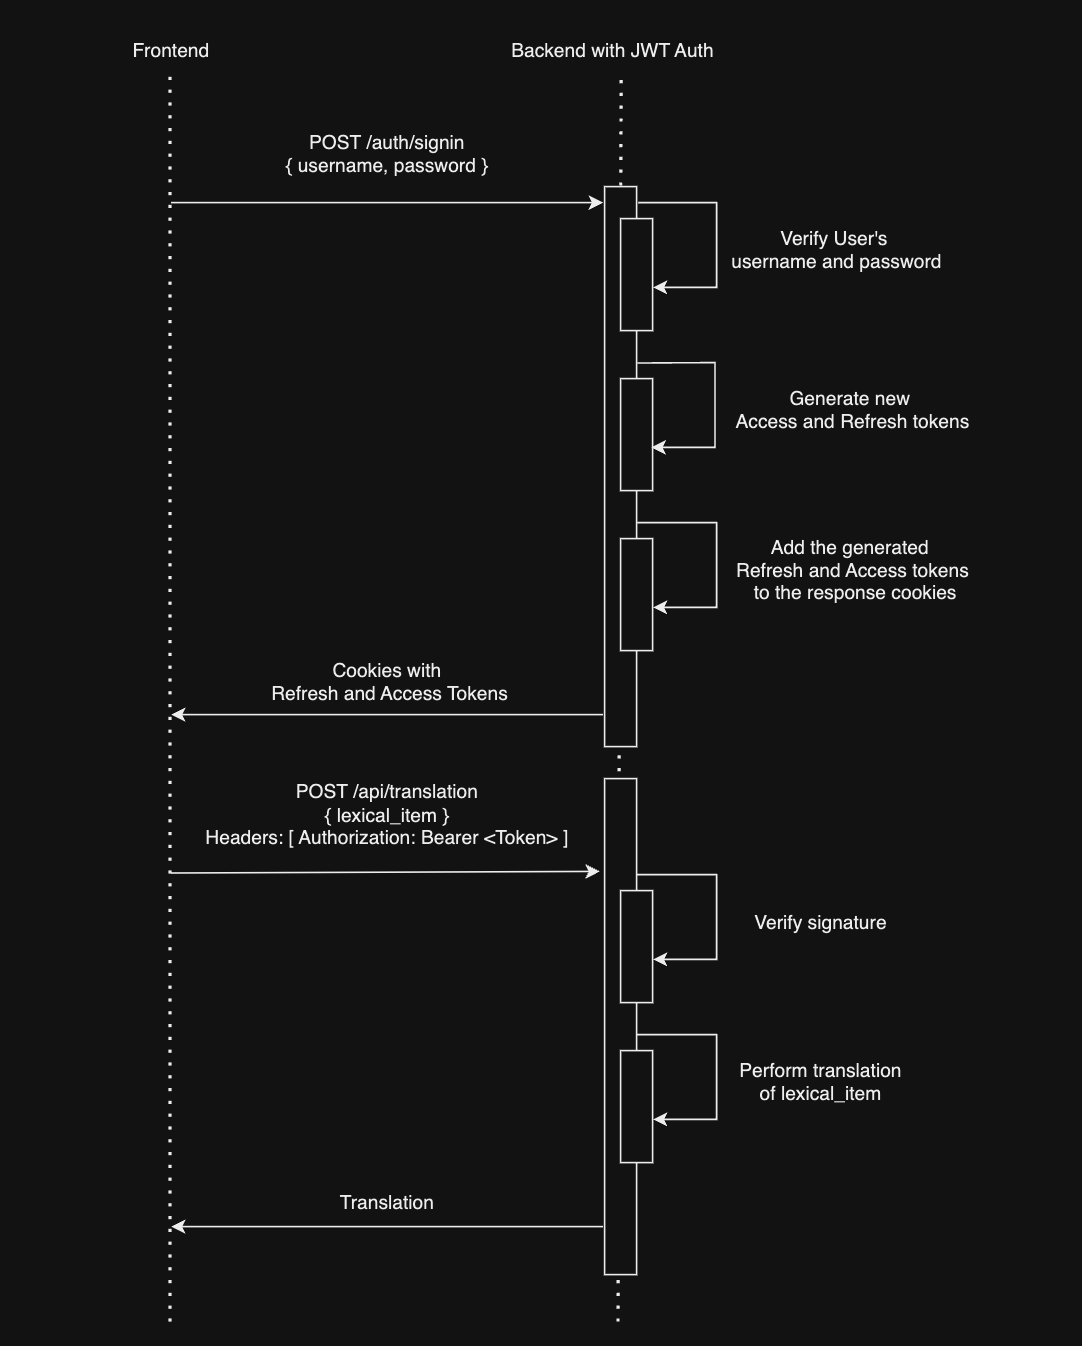
- Client Login: The user sends a login request (with username and password) to the backend.
- Token Generation: The backend verifies the credentials and generates two tokens:
- Access Token: Short-lived (e.g., 1 hour), used for authentication.
- Refresh Token: Long-lived (e.g., 30 days), stored in a database and used to generate new access tokens.
- Token Storage: These tokens are added to the HTTP response as cookies and sent back to the client.
- Authorization: On subsequent requests, the client includes the access token in the Authorization header (as a Bearer token). The server validates the token before processing any protected actions.
- Token Refresh: If the access token expires but the refresh token is still valid, the client sends a refresh request. The server validates the refresh token and issues new tokens.
- Re-Authentication: If both the access and refresh tokens expire, the client is required to log in again.
Handling Token Expiration
Tokens have expiration times to ensure security. For instance, an access token might expire after 1 hour, while a refresh token lasts for 30 days. If the access token has expired but the refresh token is valid, the server will generate a new access token without requiring the user to log in again. If both tokens expire, the user must log in again.
Building JWT Authentication in Golang
Setting Up the Backend
We’ll be building the backend in Golang. Here’s the overall structure:
- CMD: Contains the main application entry point.
- Internal Package: Contains business logic, models, and infrastructure such as database connections and third-party services.
- Middleware: Validates access tokens.
- Server: Manages HTTP requests.
- Use Cases: Houses business logic (e.g., authentication, token generation).
Sign Up and Sign In
- Sign Up: We validate the input, check if the user already exists, and if not, create a new user in the database. Then, we generate both the access and refresh tokens and store the refresh token in the database.
- Sign In: We validate the username and password, and if correct, generate and return both tokens.
Here’s a snippet of the sign-up logic:
// SignUp Logic
user := models.User{Username: username, Password: hashedPassword}
if err := db.Create(&user).Error; err != nil {
    // Handle error
}
// Generate tokens
accessToken, refreshToken := generateTokens(user.ID)
Token Generation
For both access and refresh tokens, we use claims in the payload to set the sub (subject) as the user ID, the iat (issued at), and exp (expiration) for both tokens.
claims := jwt.MapClaims{
    "sub": userID,
    "iat": time.Now().Unix(),
    "exp": time.Now().Add(time.Hour * 1).Unix(), // Access token expiry
}
We sign the tokens using the HS256 algorithm and a secret key.
Middleware: Protecting Routes
To protect your routes, you can create a middleware that intercepts requests, validates the JWT, and extracts user information from the token.
func JWTMiddleware(next http.Handler) http.Handler {
    return http.HandlerFunc(func(w http.ResponseWriter, r *http.Request) {
        tokenString := r.Header.Get("Authorization")
        // Validate the token and extract claims
        token, err := jwt.Parse(tokenString, keyFunc)
        if err != nil {
            http.Error(w, "Forbidden", http.StatusForbidden)
            return
        }
        next.ServeHTTP(w, r)
    })
}
Frontend Integration
On the frontend, we need to handle the login and token refresh logic. We use React for the UI.
Token Management in React
On the frontend, JWT tokens are managed using cookies. When a user logs in, the access and refresh tokens are stored in the browser, and all subsequent API requests include the access token in the Authorization header.
Refresh Token Logic
If the access token expires, a refresh request is made in the background to get new tokens, allowing the user to continue using the app without noticing any interruption.
Here’s a simplified example of how the token is handled in a React app:
const refreshAccessToken = async () => {
    const response = await fetch("/refresh", {
        method: "POST",
        credentials: "include", // Include cookies
    });
    const { accessToken } = await response.json();
    setAccessToken(accessToken);
}
Secure Token Storage
For security, ensure that cookies are marked as HttpOnly and Secure to prevent them from being accessed by JavaScript and transmitted over non-HTTPS connections.
Conclusion
JWT is a powerful tool for implementing stateless authentication in your applications. By using short-lived access tokens and long-lived refresh tokens, you can build a secure and scalable authentication mechanism.
With the Golang backend and React frontend outlined here, you’re ready to implement JWT in your own projects. If you want to explore the full code, check out the GitHub repository linked in the video description!
If you found this guide useful, feel free to leave a comment, like the video, and subscribe for more content. Happy coding!
Resources Mentioned in the Post
- Source code: https://github.com/bukhavtsov/smart-dictionary
- JWT RFC: https://datatracker.ietf.org/doc/html/rfc7519
- JWT Handbook: https://auth0.com/resources/ebooks/jwt-handbook
- JWT Go Library: https://github.com/golang-jwt/jwt